Week 12: Mac & Cheese – Tomato-Basil Stuffed Mac & Cheese Pizza

Today marks my first day of marriage. As this is my wedding week (which leads directly into three weeks of honeymoon abroad), these next few challenges will be truncated and minimized to just a brief overview in the series of pictures that may never be fleshed out with descriptions in the future.

In the first of this series will be a deep dish mac & cheese pizza that is stuffed with tomato and basil. To begin, the mac & cheese is made using basic elbow pasta for a classic look and texture.

JPEG image-6BF480CB118E-1

The creamy, cheesy aspect is a matter of adding in the right amount of butter, milk, mozzarella and cheddar.

JPEG image-AE38394ACAD6-1.jpeg

Many taste tests are done to ensure the mac & cheese is worth a nibble all by its onesie. A cast-iron is used to build the pizza.

JPEG image-05A9DFAA4E2D-1

In the construction, a base of macaroni is pilled onto a thicker style dough so as to support the macaroni that will be piled on. A layer of macaroni is followed by a sprinkling of chiffonade basil and halved San Marzano tomatoes. A final layer of pasta and cheese follows with a brief oven session that kisses the dish with light browning.

JPEG image-EFCA0B939CAF-1

Using a spatula along the firm, crisp crust, this pizza can easily be removed before the cutting begins.

JPEG image-039EC54914C1-1

The resulting pizza is absolute hedonism with a soft punch of juicy tomato and basil leaves.

JPEG image-E09CE8211F10-1

A bottle of Etna Rosso is selected to pair and its just what is needed to cut through all the richness brought on by the cheesiness and thicker crust.

JPEG image-2D38CF975FD2-1

This fusion of comfort food seems like the tame kind of thisiswhyyourfat cuisine that would be worth the energy expended in its production. In my opinion, it’s not. Thankfully, these challenges do not bear the weight of regret despite any hiccups. And despite the inferiority to the classics being amalgamated here, the pizza itself was worth devouring in full.

Week 11: Malaysian – Chicken Curry Roti Canai pizza

To slam dunk this week’s challenge, I took on two Malaysian standards that are often served together and used kitchen wizardry to morph the duo into a pizza. Roti canai, a ghee-heavy flatbread designed to trap pockets of air between thin layers of dough, is an ideal base for a pizza. Its usual partner, chicken curry, makes for a topping worth exploration. To begin, I slathered myself with ghee and dove into making roti canai from this very detailed recipe.

Roti Canai

IMG_1282

The formation of the dough is rather straightforward, requiring much kneading to acquire an incredibly smooth texture and a minimum 6 hours of resting time before the shaping begins.

IMG_1283

Each batch produces many sets of roti canai, which are divided evenly before the dough is allowed to settle.

IMG_1285

Each of these puppies has the ability to stretch out mega thin. Malaysian vendors keep some pretty dope moves to slap the dough into shape. Incapable of such performance, I managed to coax out a set of comparably paper-thin dough sheets with some delicate moves.

IMG_1284

Once stretched out, the paper dough is folded over itself to create air pockets and then swirled into a disc. This little creation sees a brief resting period while a pan gets hot on the stovetop.

IMG_1286

These wound-up formations offer some resistance to stretching despite their original malleability. Stretching the dough by hand offers a small amount of give but the final shaping is best accomplished immediately after the dough is placed in the pan. With a ghee-greased spatula, the roti canai is untraditionally smashed and flattened into the sturdy, circular shape that is required of a pizza crust.

After building the roti canai, I turned to a BBC curry recipe for the majority of my cooking guidance.

Chicken Curry

IMG_1270 3

The process begins with making a curry paste made up of a good majority of the stronger aromatics that will be experienced such as turmeric, ginger, lemongrass and red peppers.

IMG_1271 3

For those enamored with tradition, a mortar and pestle can do the work of a food processor with the addition of a few extra minutes and intensive upper body labor. I opted for the wine-sipping version of this pummeling session.

JPEG image-E1F33FD28D1C-1

The bulk of the curry consists of chicken thigh, onion & potatoes.

JPEG image-AC27B6E693C2-1

These additions will be the main pizza toppings and act as a curry delivery system as they will be slathered in it.

JPEG image-7DA85239A472-1

The onions are allowed to soften and become fleshy before adding in the chicken, potatoes and the remaining pieces of the curry, which include coconut milk, chicken stock, soy sauce and final spicing agents. Cinnamon sticks and star anise offer surprisingly subtle but necessary aromatics. To make up for a lack of kaffir lime leaves, bay leaves and lime zest were used after finding this helpful substitution guide in a sea of unhelpful websites insistent that there is no worthwhile alternative to the real thing.

JPEG image-21F409748C94-1

To keep the curry sauce tight, I reduced this batch down a good amount so that the pizza would not be dripping over the sides when applied.

JPEG image-8EC317DEF084-1

The pizza formation was pretty straightforward once the cooking was completed. With every element made fresh, no time in the oven was needed and the dish was served hot.

IMG_1298

The experience of eating this pizza was more satisfying than anticipated, especially in terms of texture and integration of flavors. The dough was so thrillingly soft and chewy while the chicken and potatoes were tender but able to add character. The heat didn’t jump out but rather mingled with the rest of the components, and the sauce was boldly savory without any one aromatic dominating. I devoured two sets of pizza in one sitting, but not without wine.

IMG_1300

To pair with the curry pizzas, Vols – “Vols II,” Riesling, Spätlese, Wiltinger Braunfels, Mosel 2014 had just the right touch of sweetness to combat the heat while its searing acidity cut through the richness of the coconut curry. The nose is flooded with petrol and lime zest while tart pineapple and brilliant slate minerality make up the palate. This is a beautiful wine all on its own but can really complete an experience, as it did here.

It’s successes like this that make me bananas for a group like r/52weeksofcooking.

kevin running wild


Week 10: Braised – Beet, Fennel & Goat Cheese Pizza

This week’s braising challenge is a considerably useful method of cooking that has only come up in our kitchen when brussel sprouts or potstickers are involved. In the case of the former, brussel sprouts had long baffled us as to how to best cook them without a long roasting process. Braising allowed for a quick sear to create the tasty bonus flavors offered by the Maillard reaction while accomplishing the tenderness sought out at a fraction of the time it would take in the oven.

For this pizza, I chose to discover the braising potential of fennel, a hardy root vegetable that can charm or dissuade any indulgers with its vibrant anise aromatics. Having only recently succumbed to fennel’s appeal, I am still in a rather obsessive phase that peaked this time last year with my addiction to fennel & grapefruit soup. Here, the flavors of fennel and some of its dear friends will come out and frolic.

JPEG image-C25B6172F98B-1

Sharing the spotlight on this pizza is fennel’s root vegetable buddy, beets. Even in the grocery store, they are already rather neighborly.

JPEG image-70B66FBBD467-1

With the help of a mandoline, roasted beets were thinly sliced and prepped for a marinade.

JPEG image-F04899F8D068-1

Before juicing the grapefruits for the marinade, I included the grapefruit zest to allow the tart flavors to pop. A splash of red wine vinegar helped bolster the marinade.

JPEG image-1A8B4A3D2C9F-1

When it comes time to braise the fennel, only the bulbous base was used while some of the fronds were reserved for the final plating.

JPEG image-61067E68401D-1

Using a knife this time, I sliced the fennel carefully so as to best preserve the architecture within. During cooking, each portion was flipped methodically with tongs to keep the structure in tact for the final presentation.

JPEG image-32E43613E24F-1

The pizza was built using a somewhat puffier crust that had boiled potato shavings folded in for a fluffier texture. The final toppings included the grapefruit-marinated beets, fennel, goat cheese and a sprinkle of mozzarella. Shaved almonds and fennel fronds dressed the pizza upon its completion.


JPEG image-FDAAB1B2E29A-1

While keeping an array of fun flavors, this pizza lacked a sense of moisture as its creator didn’t think to incorporate some semblance of a sauce. Taking a cue from the clam pizza from last week’s challenge, a quick spritz of the beet marinade may have saved this pizza from its shortcomings. Beyond this, the flavors meshed well enough to be completely devoured, but there was a certain integration lacking. The wine, in this case, helped bridge some missing links in the dish.

JPEG image-D1CB22A2290D-1.jpeg

Chosen to pair with this pizza, Domaine Eric Louis – Sancerre, Loire Valley, France 2014 keeps a fresh and lively style of Sauvignon Blanc behind its cutesy Little Prince-esque label. Its natural affinity for goat cheese is aligned with a geographic history within the Loire Valley. The region’s Sauvignon Blanc has been enjoyed with the local and abundant goat cheese for so long it seems almost too perfect, and yet it is one of the few true classic pairings that is cherished for its simple dance of tangy, refreshing flavors. The aromatics of the Sancerre pile onto the flavors of grapefruit and herbaceousness in the pizza with a similar roar but the bitterness found in lingering after each bite admittedly might be better managed by the roundness of a slightly off-dry Riesling.

JPEG image-77FC9F2C4E3D-1.jpeg

Even still, neither pizza nor wine made it through the night.

Week 9: From A Can – White Clam Pizza with a can of rosé

For this next challenge, “From a can,” I decided not to indulge in my favorite pizza standard of artichoke red pie, despite the use of both canned tomatoes and artichokes. Instead, I took on a pizza that I had never dreamt of making: white clam pizza. URBN Coal Fire Pizza/Bar in North Park, San Diego boasts a New Haven-style, thus features a classic clam pie. It’s the perfect pizza to order for lunch on a Sunday with a glass of Provence rosé.

I generally operate under a zero-seafood-from-a-can policy when I cook so I’ve decided to slap on some bacon for a bit of flavor insurance.

JPEG image-816B75937432-1

Bacon offers unity between land and sea and, for those iffy about clams on a pizza, it can become the focal point of the experience.

JPEG image-788B180C7962-1

Garlic is the perfect aromatic to go alongside seafood so an abundance is used to coat the base.

JPEG image-F5E626A4E1E7-1

Classically, fresh littleneck clams are used but since freshness is already being shunned for the sake of this challenge, the clam of choice is not a point of concern.

JPEG image-8600C3F43778-1

Ignoring how closely these clams resemble ID4 aliens sealed in an Area-51 tube once unveiled, these clams need to be coarsely chopped with the juice reserved for extra flavoring.

JPEG image-C3C0657DB819-1

Once outside of their murky clam juice home, these puppies look ready to hop on a pizza and snuggle up alongside some bacon.

JPEG image-DE0916D54A3D-1

The dough used is a 3:1 bread and whole wheat flour, which was rolled out as thinly as possible while the oven climbed up to a maxed out 550°F. When freshly made, this dough can insert a subtle yeasty sweetness in the pizza’s overall flavor.

JPEG image-E2303CD4082B-1

Using olive oil & garlic as the sauce, mozzarella provided a base of cheese and the protein followed with parmesan grated overtop. Most importantly, a couple spoonfuls of clam juice were sprinkled over evenly before popping this bad larry into the oven for 7-10 minutes.

JPEG image-CD07B18C5A9D-1

In keeping with theme, a can of Alloy Wine Works – Grenache rosé, Central Coast, California was the pairing of choice, harking back to my URBN clam pizza & rosé days. With underripe raspberry and white strawberry notes balanced by the hint of actual sweetness in the wine, this wine tasted like the can’s own promising of sour patch kids. The inherent saltiness of the pizza even further emphasized the fruit of this rosé but it was the wine’s waxy texture and fuller body that helped manage bursts of smoky bacon.

JPEG image-5BAED5A0789D-1

The briny flavors were well integrated with the garlic and bright, tangy parmesan with the occasional bite of sea water surprise that is likely inevitable with a dish like this. The pizza kept pillowy texture that stayed moist and fresh thanks to the addition of the clam juice on top, without which this pizza would be lost.

JPEG image-06A582C1A983-1

Nailed it.


Week 8: Japanese – Unagi, scallion & macadamia nut pizza

Unagi: one of the great standards to be unhesitatingly penciled in on a sushi order sheet. With their own dedicated sauce, those puppies don’t require a hit of wasabi to jazz up the flavor rollercoaster. They are a closed-system of deliciousness, which is being tapped for this week’s kitchen challenge: Japanese.

The local Japanese grocery store keeps a range of inspiring ingredients, anything from yuzu to octopus arms, for Japanophiles to get giddy about. Despite my Chinese heritage, I get a little dizzy with excitement over Japanese culture and cuisine. While shopping, a load of unrelated foodstuffs, including a large bottle of Kewpie mayo, find a new home in my kitchen along with the freshwater eel I originally came for. Even still, this pizza will remain a simple but moderately snazzy unagi experience. (And yes, this entire paragraph was built to prop up a single irrelevant gif.)

Unagi Pizza

JPEG image-730DED8D0D5D-1

To complement the eel, I decided on including both traditional & non-traditional toppings. Scallions were chopped coarsely with half joining the eel during the cooking process while the other half for garnishing afterwards. This would offer two types of textures and a bit of extra complexity with the range of fresh and cooked onion flavors.

JPEG image-4EF9E09A01E3-1

Cheese bowed out of this project and instead I substituted the milky creaminess of macadamia nuts, which were lightly pummeled with mortar and pestle.

JPEG image-89581C3F8533-1

To craft this pizza appropriately, the dough needed to be a bit more oblong in shape, stretched out into a more rectangular platform so as to not require the usual circular symmetry in flavors.

While eel sauce would make-do as a sauce, it needed a bit of thinning out. For an extra bump of flavor, I blended in sesame oil and slathered the mixture right onto the dough with a brush.

JPEG image-D1E78F704340-1

Though this dough seems perfectly eel-shaped, instead the eel was chopped into three pieces to fit evenly side-by-side to create more uniform pizza slices.

JPEG image-E5EB6B3E8ADD-1

Due to the high oven heat, the macadamia nuts threatened to crisp up beyond what might delight the palate. Next time, it would be wiser to wait until the final minutes of baking to add the nuts on top. Luckily, any possible off flavors from over-toasting did not distract from the larger flavors of sweet, tender unagi.

JPEG image-761CA8C759E6-1

A wine fit to go with both aspects of sweet and savory in this pizza would need a touch of sweetness of its own to balance this pairing. Joh. Jos. Prüm – Riesling, Kabinett, Graacher Himmelreich, Mosel, Germany 2012 is refreshingly mineral-tinged with lime, green apple and peach offering a range of vibrant aromas that sing loudly on its own. While Kabinett in style, this Riesling keeps the touch of sweetness needed to manage the big flavors of unagi and eel sauce. Each sip energizes the palate to chase those unagi flavors while each bite of pizza begs for another taste of wine. It’s a near-perfect union and an experience worth recreating, which makes this metatheme project a win.

Week 7: Air – Basil Foam Pizza Topping

For this week’s challenge, I dedicated some time to learning about modernist techniques for making foams and emulsions. After combing through stacks of online literature (like this, this and this), I managed to gain little confidence that some chemical tinkering would go without failure. And with that, I cannonballed into this project without concern for the outcome and came out lucky.

Basil Foam

To begin, I blanched fresh basil leaves, and a few spinach leaves for extra color, before dousing them in an ice bath.

JPEG image-ACC4121DF625-1

After wringing out the excess water from the leaves, I blended the leaves with a pinch of salt and a small amount of half and half, adding just enough to create a smooth liquid. I kept the additional cream to a minimum so as to maintain the concentration of both color and flavor in the resulting foam. This step required a few pauses to scrape down the sides of the blender for consistency, which probably would not have been as dramatic a task if I had made a bigger batch.

JPEG image-AF109A3BAC87-1

Instead of leaning on any one particular technique discussed in the molecular gastronomy websites, I went for a combo punch of ingredients that would undoubtedly turn this mess into some kind of foam. Any foam.

JPEG image-6CB4FF9F4DE8-1

Adding in 1/16th a teaspoon of xanthan gum as a thickener and an egg white of one egg and 1/16 teaspoon of agar agar as stabilizers, I gave the emulsion one last blend before passing it through a sieve into an iSi whipped cream dispenser. After unloading two cartridges of nitrous oxide into the canister, shaking vigorously with each delivery, the iSi took a nap in the fridge while pizza was made.

JPEG image-3F1DF0B395BE-1.jpeg

Basil works very well alongside tomatoes so I decided to flip this pizza onto its bottom and create an upside-down pepperoni pie with mozzarella spread right over the crust, followed by pepperoni and then heaps and heaps of freshly-made tomato sauce. Once out of the oven, the pizza was doused with parmesan and cooled slightly before basil foam was applied in the hopes of not deteriorating its delicate nature too quickly.

JPEG image-98413716BF70-1

The foam came out light, fluffy and of a satisfying shade of ecto-cooler green. The flavors remained fresh and leafy in its new form, which made a slice of pizza look like a crisply-wrapped present. Even when melted into alien goop, the foam was worthy of using as a dip for crust.

The pairing

With more herbaceous flavors to consider on a standard set of toppings, I wanted a wine to reflect the same green quality found on the pizza. Varietally known for its green bell pepper notes, Cabernet Franc from Bock (Hungary, 2011).

JPEG image-4F21BD74BE71-1

The wine was remarkably plush and easy to get along with, primarily flaunting juicy black cherry and raspberry notes with hints of chopped mushroom and fresh soil interlaced. Together with the pizza, the soft yet powerful style of this wine was able to match the richness of the tomato sauce and provide a backdrop of dark berry fruitiness for the herbaceous flavors to play off of. Not the pairing that was expected, but one that worked nonetheless.

JPEG image-958EDF549C46-1

With a canister of basil foam hanging out in the fridge, even some everyday cast iron tortilla pizza can use a little pizzazz. Though the classic remain classics, I found myself continuing to reach for the iSi for that extra hit of flavor. It seems I’ll have to mark this challenge down as a success.

Week 6: Finger Foods – a trio of pizza snacks

Exploring the miniature world of pizza-inspired finger food, as decreed by this week’s challenge, I decided to experiment with three different styles to see how far whimsy could take me. To begin, I chose to bring to life a mediocre pizza cone I once experienced at a night market but this time it would be tastier and in bite-size form.

Pizza Cones

Ideally this project would begin with an army of small cone-shaped, oven-safe items such as a basic frosting tip, at the ready. If this is not the case, the next best option is to create a set of Cones of Dunshire out of foil.

JPEG image-3BD190DFAAA6-1

Using room-temperature pizza dough, I rolled out thin, roughly-shaped triangles that were wrapped once around each cone. The cones were baked pointy side up until browning and gently release from mold when cool enough to do so.

To prep for the next stage of cooking, foil was wrapped tightly around a baking dish and gently poke tiny, well-spaced holes for the cones to sit upright in. These cones were filled with a modest layering of fresh mozzarella, marinara sauce, finely chopped pepperoni, more sauce, and shredded mozzarella to top.

JPEG image-4CD72F78BFBB-1

These were placed back in the oven for another 5 minutes and served in the very same delicate DIY foil holder as before.

JPEG image-7FE202479377-1

While the presentation is lacking a bit of panache, these small treats have potential for greatness in the future, especially if I combine the piping mousse used in the following finger food.

Pepperoni Cream Gougeres

Gougeres are small pastries that create little air pockets when they puff up in the oven, providing space for a creamy treat to be piped in.

JPEG image-9A151BCF907D-1

While these might be considered the most successful of my experiements, I encountered many difficulties along the way. Using a very basic recipe provided by the Addison kitchen, I had a batch ready to go within minutes.

JPEG image-C0372E3FD6C8-1

Boiling the butter and milk together, I added the flour all at once and beat the resulting goop for three minutes. Off heat, I whipped in the eggs one at a time and then added parmesan and season with salt to taste. This was then added to a pastry bag, though a sturdy ziplock bag would make a fine enough substitution.

JPEG image-91BF30592A1B-1

Piping out small swirly poops was my first mistake. The shape created at the base of each pastry did not allow half the batch to rise with the appropriate amount of spacing within. It is better to start with a fat blob as the base, swirling towards the top to avoid a Hershey kiss shape.

JPEG image-476D9246B533-1

Each batch took around 20-25 minutes in the oven before crispy and light. Midway through the first batch, I noticed the color of the gourgeres remained quite pale so I pulled out the lot and painted on a sheen of whipped egg whites for some last minute coloration in the oven. The trick seemed to work so I applied the egg whites to the second batch as well.

While waiting for the pastries to finish baking, I pulled together some pizzaesque ingredients laying around in the kitchen for a haphazard emulsion. The final makeup of this concoction involved a blend of tomato chunks, mozzarella, sour cream, cottage cheese, half and half, crushed red pepper, salt, pepper and crispy pepperoni. This was added to its own pastry bag and piped into the cracks found along each puff pastry to fill the gap within.

JPEG image-5EA87828C3AB-1

At first I didn’t mind the chunky texture the pepperoni provided until the pastry bag tip kept getting clogged and splattering comically all over the kitchen from force and frustration. Had I made a bigger batch, the end texture may have been smoother as the pepperoni would have a chance to become completely emulsified. In addition, I would avoid using firmer cheeses so that the mousse remains creamy when reheated. Another couple rounds of practice should transform this puppy into a winner in a crowd.

Mini Pepperoni Pizzas

Despite my certainty that this would be the least exciting aspect of my finger food experiments, I devoted a good half hour into this project to use up some leftover dough and ingredients. The majority of this half hour was spent meticulously cutting regularly-sized pepperoni into miniature pepperoni pieces, all for the cutesy look of it.

JPEG image-F997ABDC27C3-1

From here, the dough was separated into equally-sized balls that, when pressed into shape, resulted in 3-inch rounds. And from here I built the pizza as I would any other.

JPEG image-AFA90221AAD1-1

The pepperoni scraps from earlier did not go to waste as they were chopped up and placed over the sauce and under the cheese when designing the final toppings.

JPEG image-D1CE2903E83E-1

Edible? Yes. Cute? Sure. Worth it? Eh.

The Pairing

While the flavors of these three treats were very similar overall, I would still need a wine broad enough to span the nuances of spices and texture. When it comes to classic Italian flavors of tomato and cheese and cured meats, I tend to seek out Italian wine.

JPEG image-93C771649D23-1

Vecchie Terre di Montefili – “Bruno di Rocca,” Toscana, Italy 2000 is plush, rich and easy to become friends with. While a decade and a half of aging has definitely pushed this wine into its developing stages, there is still a dense juiciness to the black cherry and raspberry fruit that can manage to the pastry-dense food. The wine’s age offers the additional benefit of extra complexity by emphasizing more savory components like black tea and chopped mushrooms. This wine is just as fun to drink with the food as it is to drink during its preparation.

Week 5 – Chili: Deep Dish Texas Chili Pizza

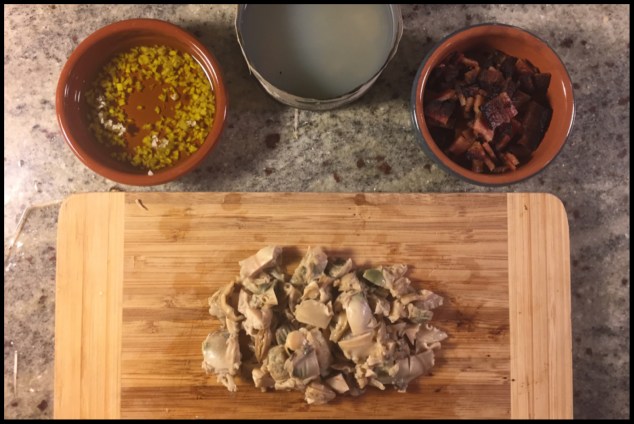
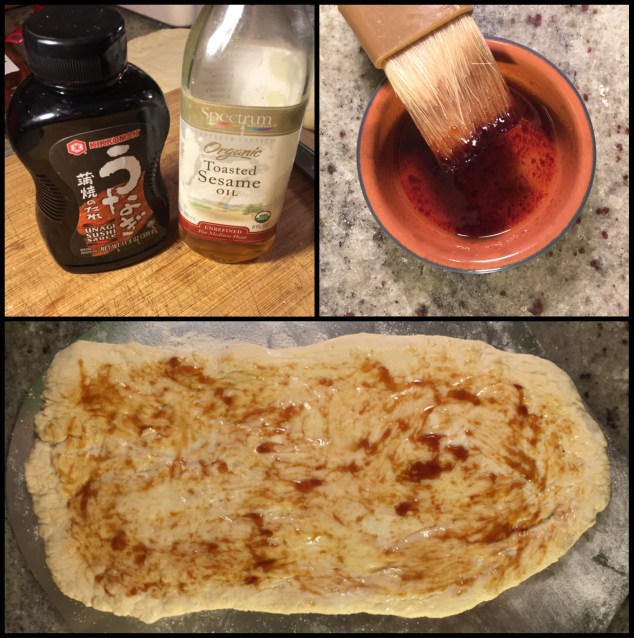
To satisfy this week’s requirement of chili, I decided to construct an oily deep-dish bed for this messy American meat stew to get cozy in. Both chili and deep-dish pizza were exotic enough kitchen ventures that, since taken on simultaneously, came with much insecurity and ready cynicism. Even in the final stages of plating, when all looked as it should have, my apprehension did not relent. It was only in that first bite when I realized I had aced it.

elaine dance on seinfeold.gif

Complying to the challenge at all was a big picky-eater step for me. Somewhere in my childhood I developed a rather aggravating fear of beans, thus the idea of chili never thrilled me. In fact, I’d never actually had chili. This may seem an atrocity until you realize I skirted around far worse super American cultural experiences until my mid-20s, like steak, burgers and bacon. Naturally, when I discovered Texas chili is traditionally made without beans, I mustered up some enthusiasm for this challenge. The next step was to learn how to make deep-dish.

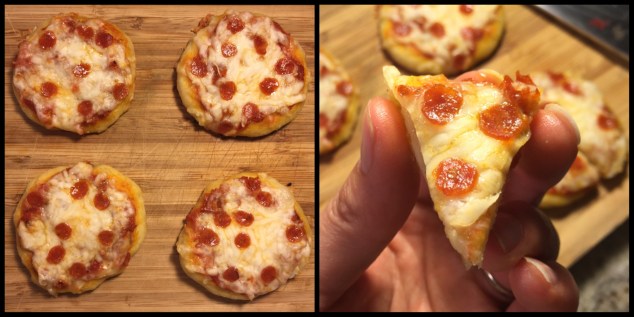
Having grown up in a thin crust household and continuing on this tradition with my thin crust-eating future hubs (from Chicagoland, of all places), I have only recently become acquainted with the thrills that can be had while munching on a slab of deep-dish. The experience is usually over too fast, partially due to how damned filling a single slice can be. I remember the jolt of surprise to find that 5 grown adults could not take down a single order of Chicago pie, which I had originally insisted was not enough food. It sure fucking was.

After perusing some online recipes, I adhered to deep-dish guidance offered in The New Best Recipe, an America’s Test Kitchen publication, straying from the template for stylistic purposes. For chili expertise, I combed through many sources and styles before mostly committing to the Serious Eats version, which I preferred for its simplicity and flexibility.

I made the chili two days in advance of the final assembly. A couple days of rest not only developed the flavor, as promised by most every recipe, but allowed me to segment my cooking plans cleanly.

Texas Chili

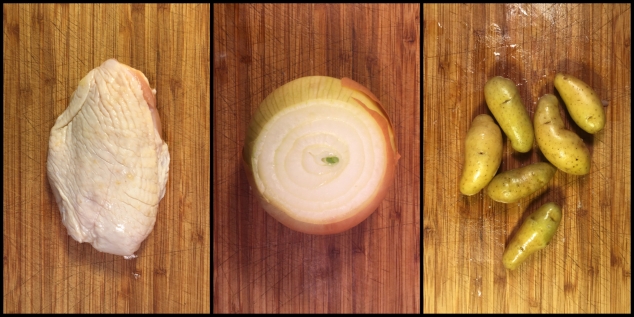
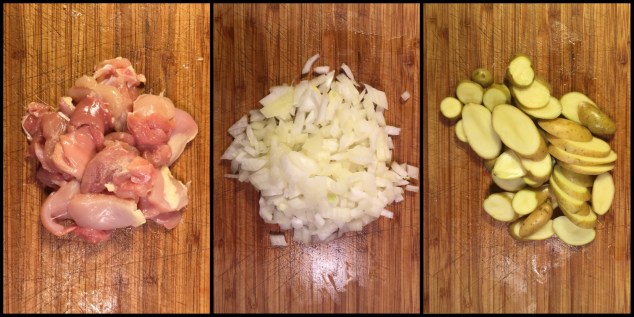
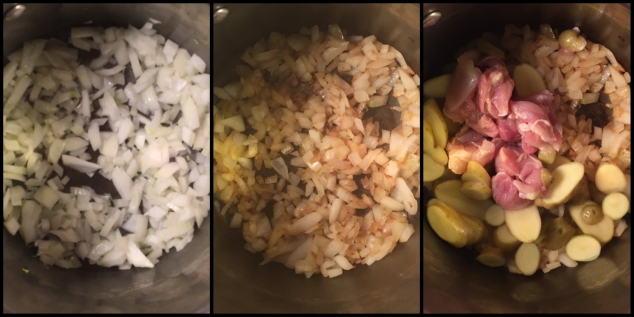
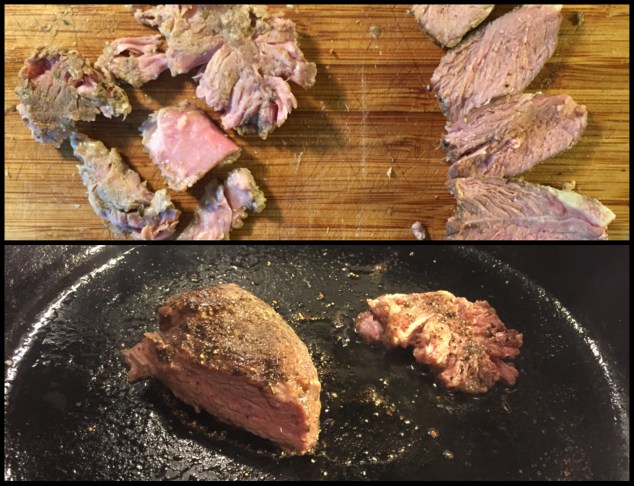
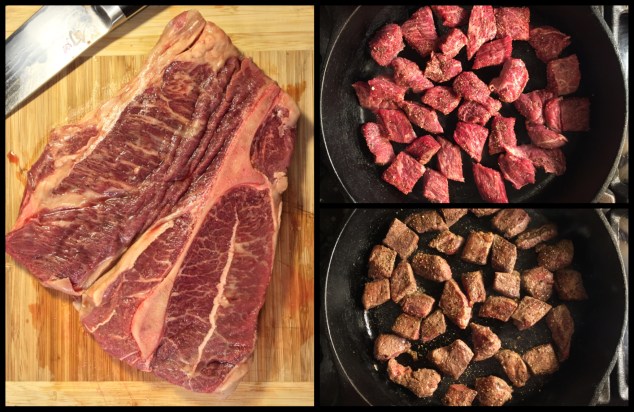
Chuck steak is prized by stewing enthusiasts to be the cut of choice due to the high amount of connective tissue, collagen, which melts into gelatin and gives the meat a more succulent texture. After chopping up a hefty bone-in steak into inch thick pieces, the meat is cooked briefly over medium-high heat until just browned. This step is open to modification according to personal preference of texture. For further guidance, J. Kenji explains his reasoning for a variation in searing.

JPEG image-22846049A1C4-1

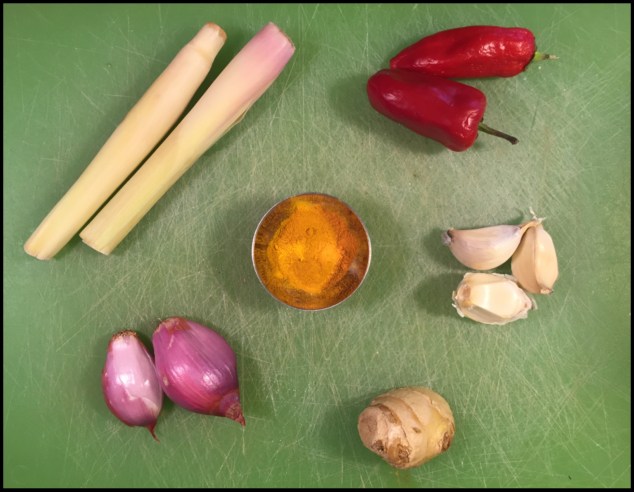
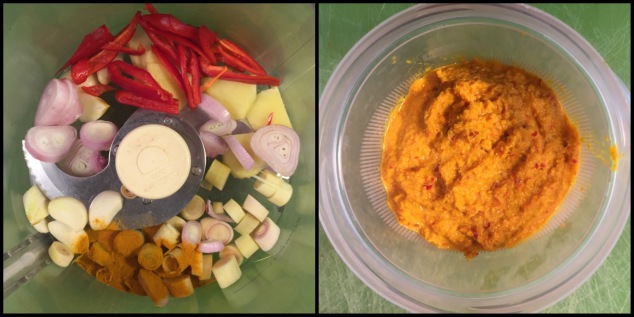
Meanwhile, the whole chili peppers to turn into paste (today: Pasilla and Guajillo) are deseeded and shredded into large pieces.

JPEG image-DE756D1CE7BD-1

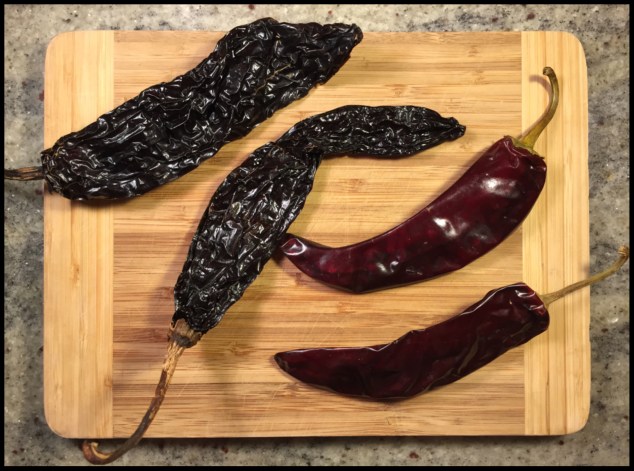
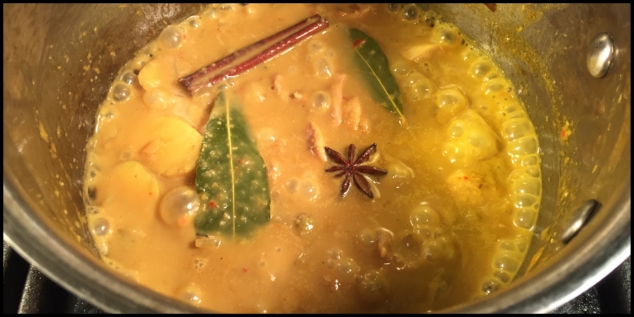
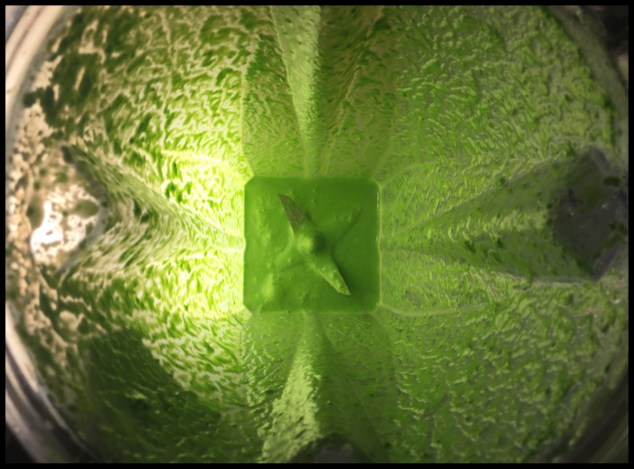
Over moderate heat, the peppers are lightly toasted in a pan for a couple minutes and carefully managed to prevent burning. Using a minimal amount of beef stock, the toasted peppers are simmered for 5-10 minutes before blending. The result: an ugly, yet super flavorful paste.

JPEG image-F3E1F1A77DCA-1

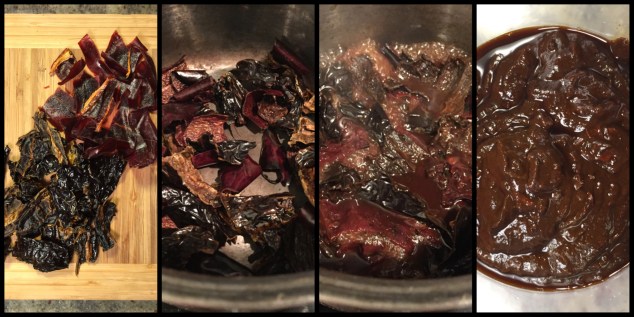
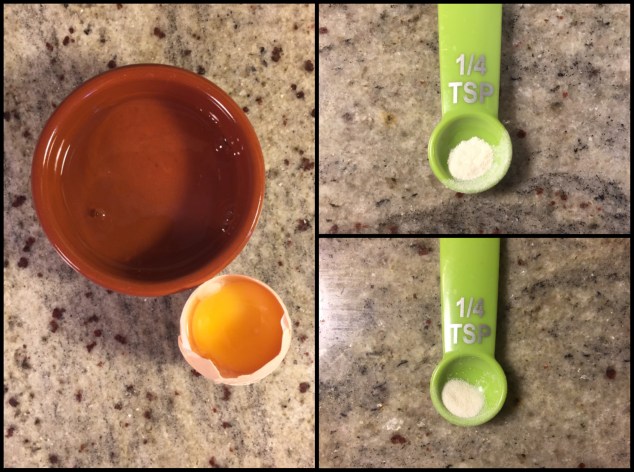
To gear up for the stew, chopped onions are softened and grated garlic is added soon after, cooked until fragrant. While aware the list of potential herbs and spices used to create the nuanced differences demarcating fervent loyalties between styles is extensive, I chose to use oregano and cumin with a whisper of cinnamon and allspice. Combining in the meat and chili paste, the remaining beef stock is poured in for the long simmer session ahead.

JPEG image-09AB357973F9-1.jpeg

After three hours, the chili is thickened with masa harina, a corn tortilla flour, and salted to tasted. To meld the flavors thoroughly, the chili takes a couple days to hibernate in the fridge, awaiting its next big adventure.
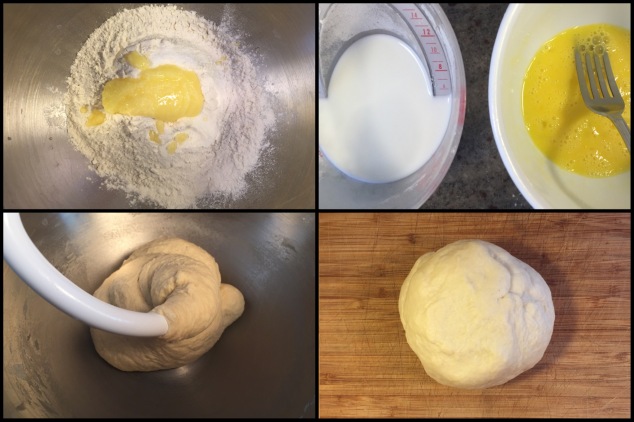
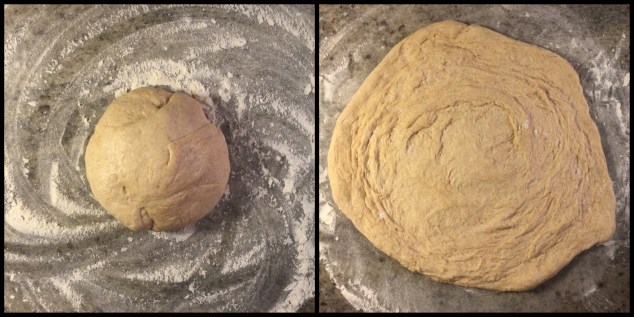
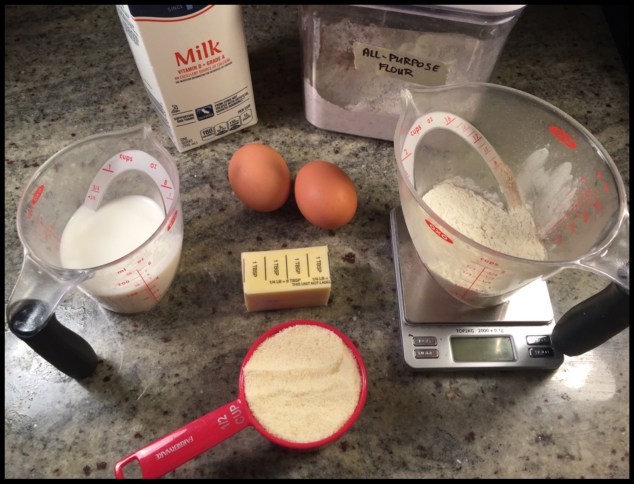
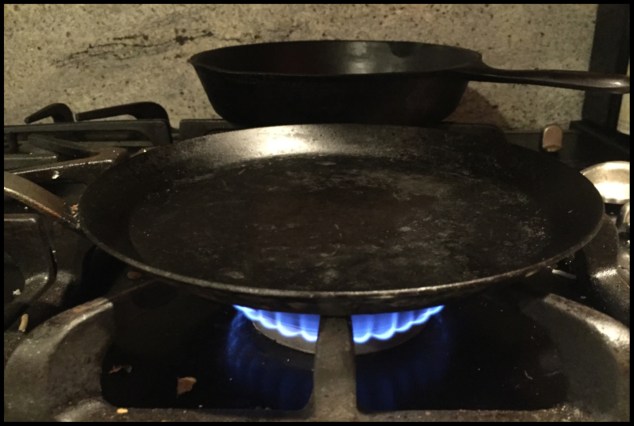
Deep-Dish Crust

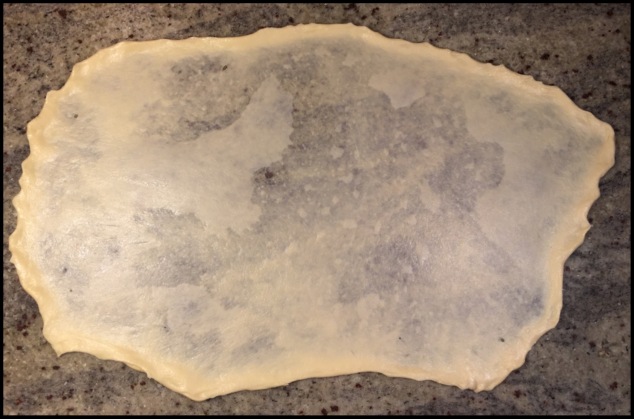
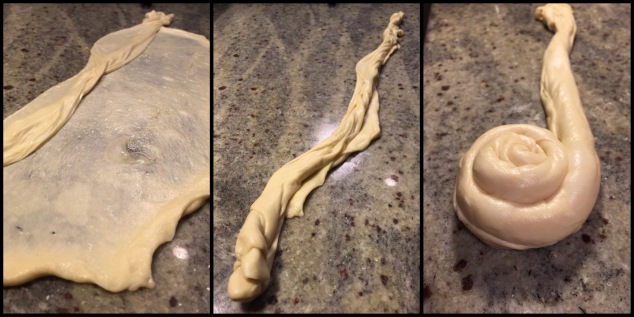
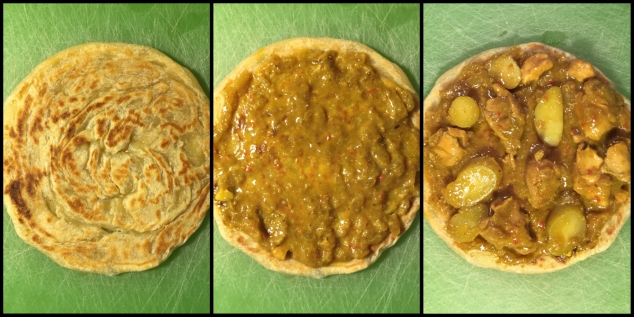
Aside from an unprompted decision to substitute a third of the flour for masa harina, the deep-dish crust is built according to every minute instruction. Everything from the many baths of oil the crust receives to meticulous sets of resting periods to conforming to the detailed oven heating requirements is designed to ensure the best possible outcome with minimal hassle. Such is the beauty of America’s Test Kitchen recipes.

JPEG image-30DC908D1E58-1

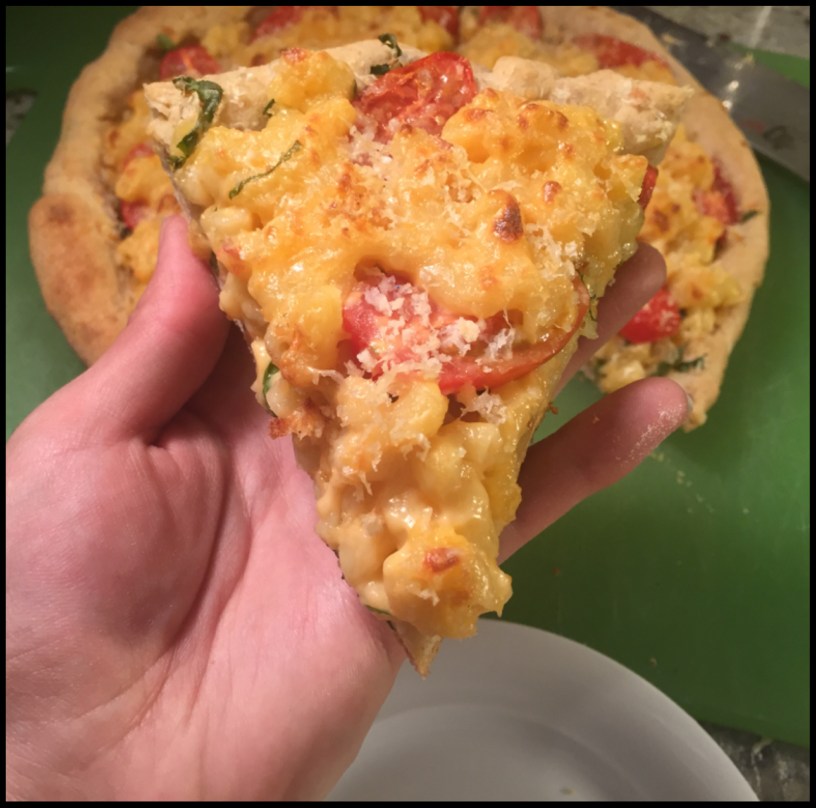
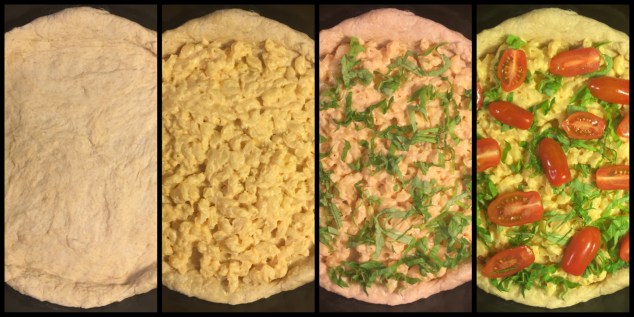
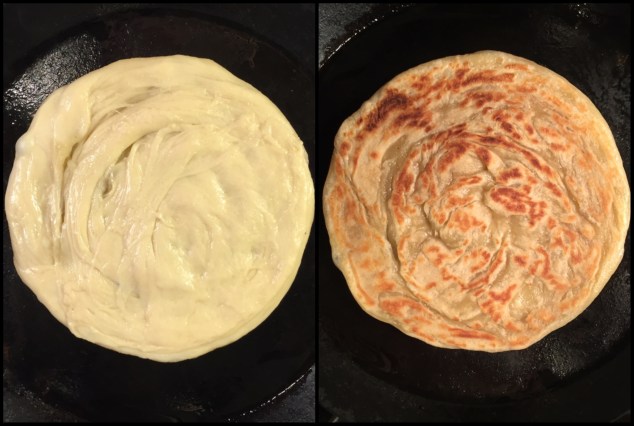
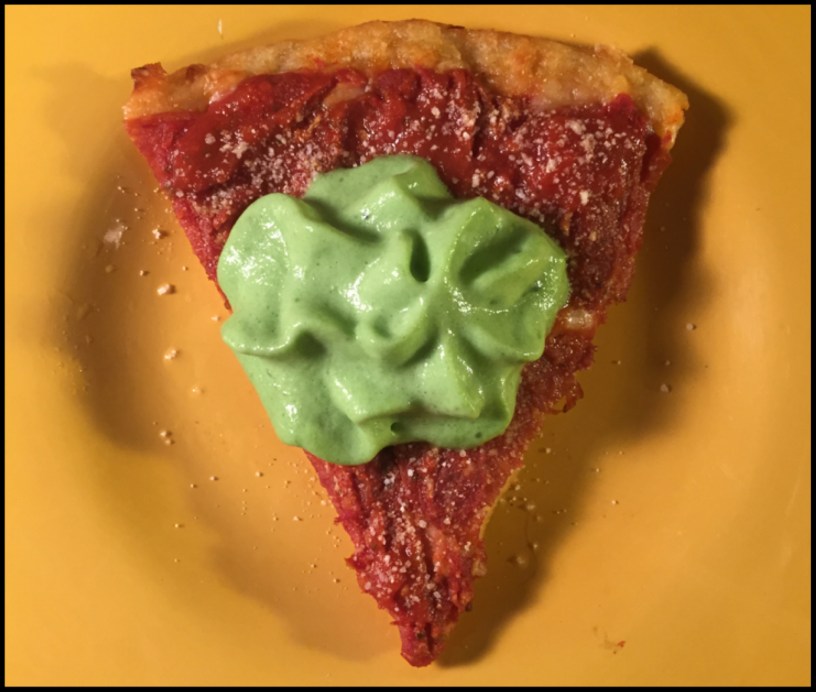
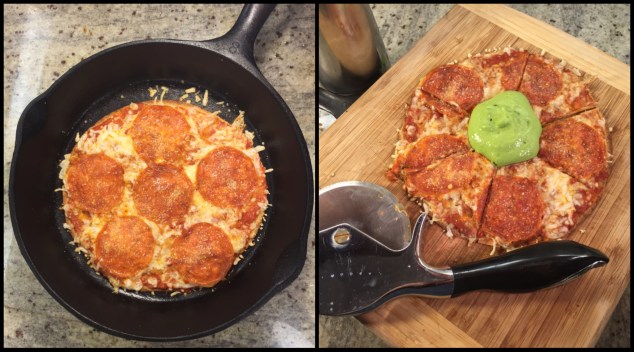
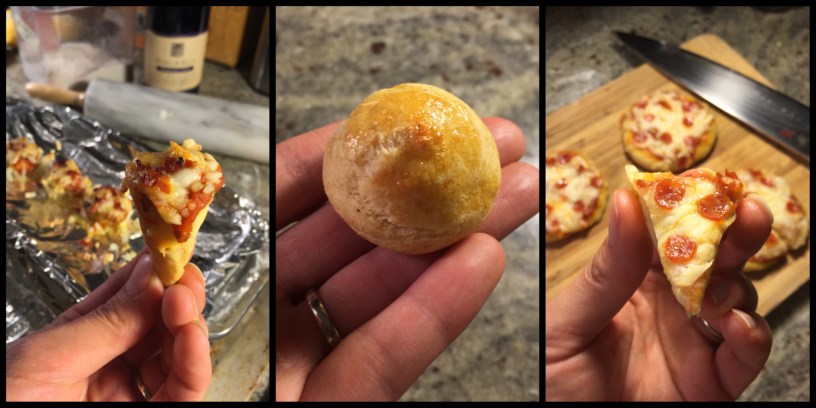
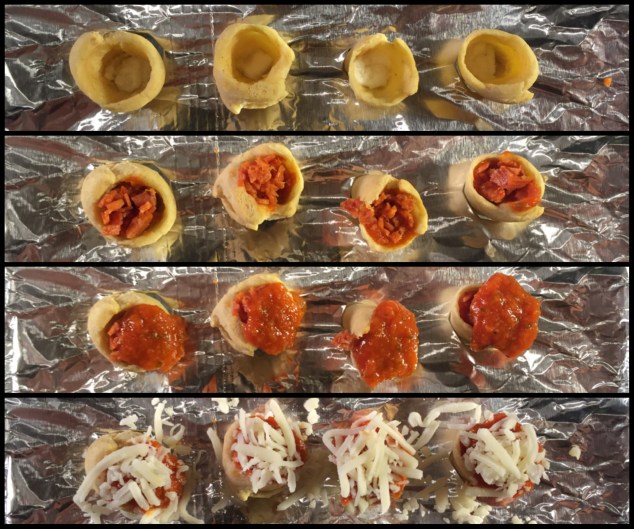
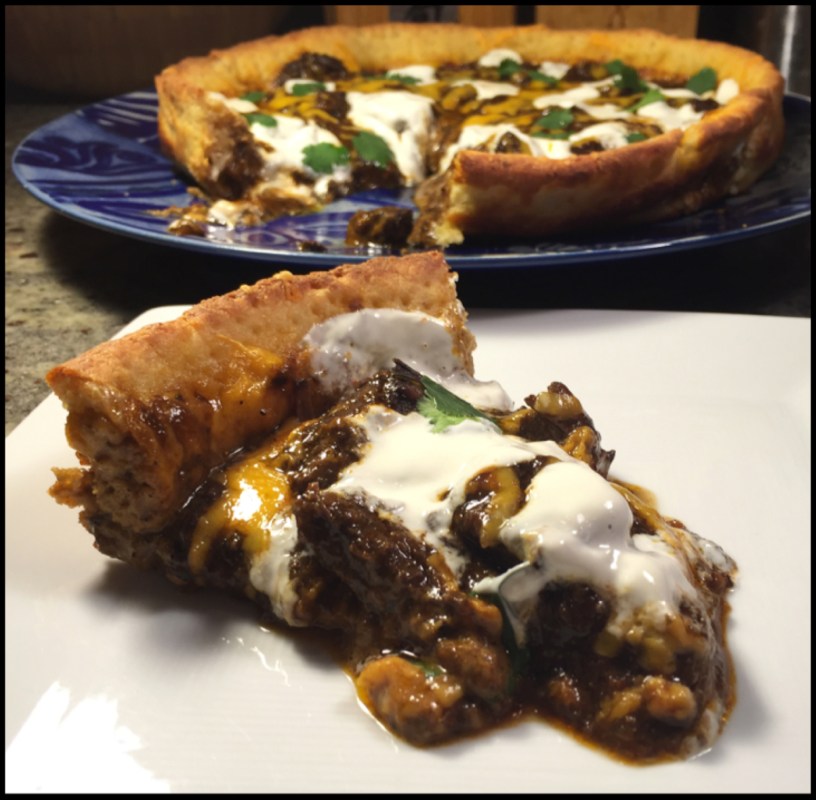
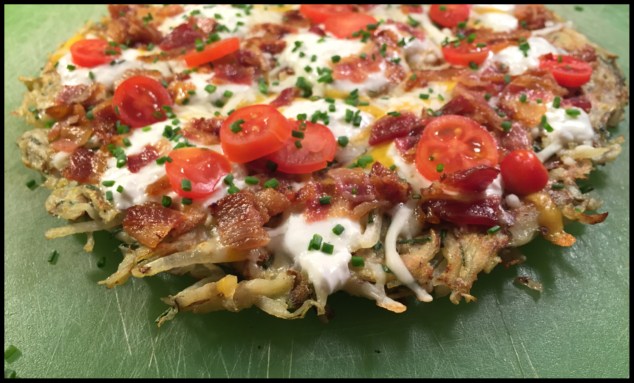
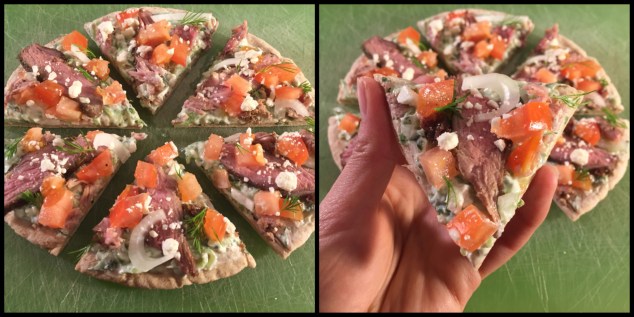
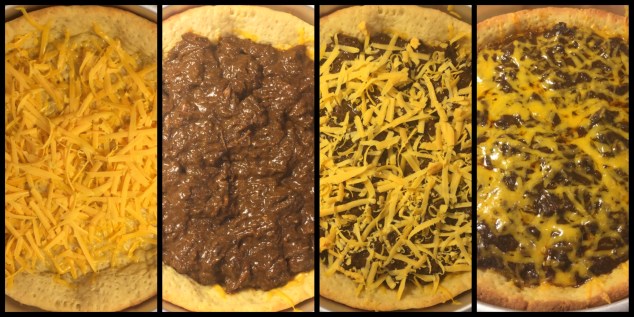
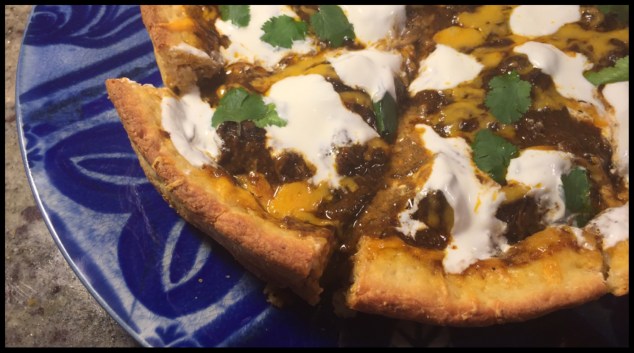
A boiled potato is grated into the crust to provide a springy texture and the crust is baked before topped so as to develop its structure. Giving all that love and attention to the crust pays off by providing a sturdy base for the weight of the chili to rest safely in. For layering, a base of shredded cheddar is placed over the crust first followed by the chili, spread evenly so that chunks of beef can be found in every bite. To follow, another layer of cheddar cheese before cooked at 425°F and finished on the top oven shelf.

JPEG image-5523CB4E5D87-1

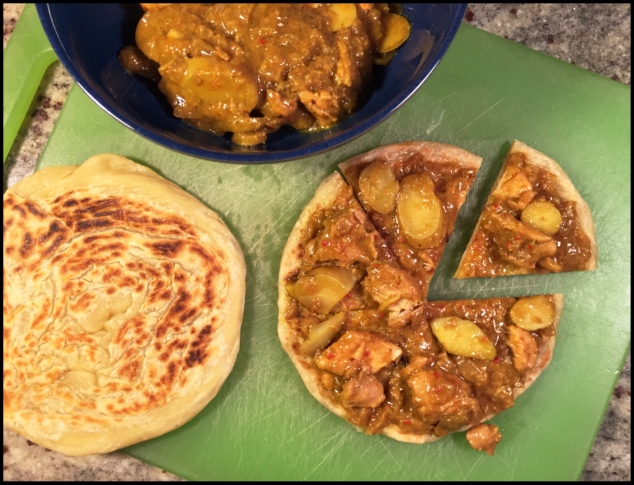
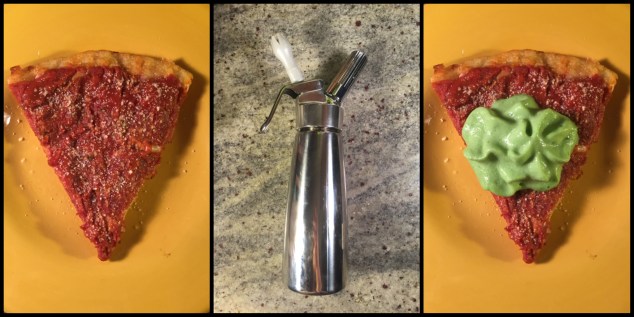
After the final stage in the oven, sour cream and cilantro leaves garnish the top.

JPEG image-299FD1E88156-1

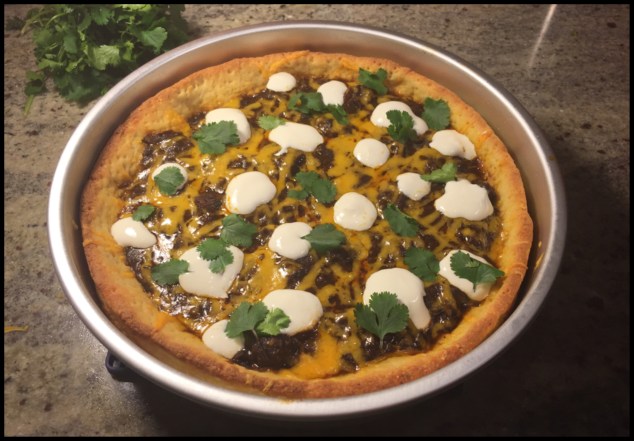
To free the pizza from its pan, some tricky spatula work is required but the pie should be able to be transferred before slicing.

JPEG image-B3268ECC8BF2-1

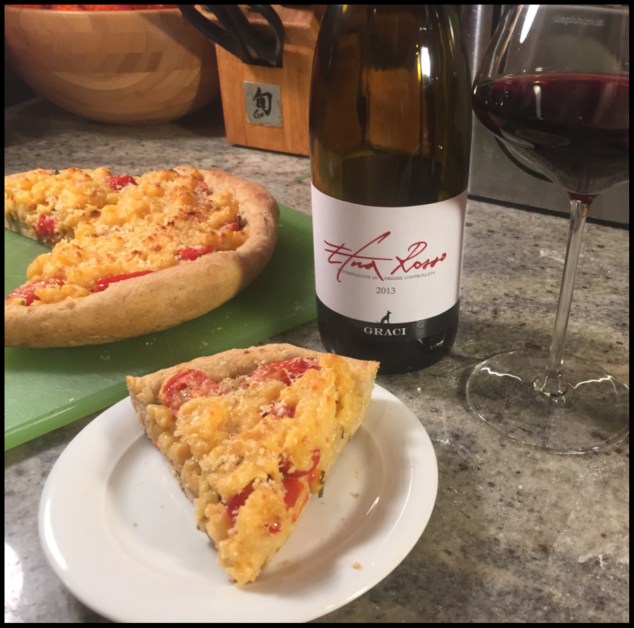
Again, I must emphasis just how shocked I am at the success of this union. Not only did the crust maintain its shape throughout, the flour swap ensured every bite was infused with deliriously blissful flavors of Fritos. The sour cream provides a velvety draping over the intensely savory edges of the chili. The meat is tender and perfectly juxtaposed with the texture of the soft, springy crust.  Altogether, it is immensely satisfying to eat and hard to not completely engulf. Wine could easily become an afterthought, but in this scenario.IMG_8466

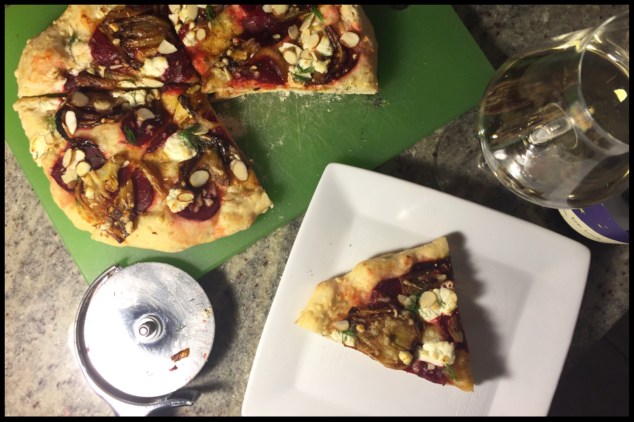
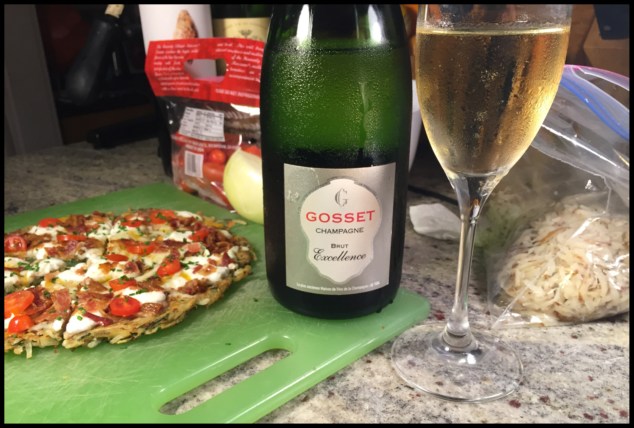
Having consulted the fine people of Village Vino, a boutique wine shop in San Diego, I chose Parr Selections – “Cuvée Anika,” Syrah, Ballard Canyon, California 2012 to pair with this pizza. The youthful purple hues of the wine distract from its actual charm of elegance and balance. The style is reminiscent of Northern Rhône, offering a heady nose of fresh lavender florals with black raspberries and peppercorn on the palate. There is a gracefulness here not often found in California wines. The firm, finely grained tannins contribute depth to the moderate body while dark fruit and fresh leather aromas lead one another in a harmonious duet.

JPEG image-3BC5694E3231-1Alongside the pizza, the pairing is playful with just enough power to withstand the long chords of flavors while matching spice with spice and countering savory with fruit. The wine naturally enhances the experience by not only providing a companion for the pizza, but also a chance to catch my breath between bites. Even still, I’m already ready for more.

Week 4 – Brunch: hash brown breakfast pizza

At the dawn of this week’s challenge, it was clear a simple breakfast pizza, softball it may be, would be all too straightforward. With three-pounds of homemade hash browns squirreled away in the freezer for any and all breakfast burrito needs, I knew I could tap this stockpile for the base of this next project. This particular batch of hash browns was made with particular care in an effort to perfect this brunch-time afterthought. I did okay. The thawed hash browns were still soggy with moisture I had failed to wring out of them. Luckily, it wasn’t too late to correct this problem with a minor squeeze session over the sink. When it came time to cook, I could only hope my efforts would provide a crispy enough base that could be spread thin while also supporting the extra weight of toppings.

Hash Brown Breakfast Pizza

To begin, preheat the oven to 350°F and toss in a couple pieces of bacon until crispy (approximately 12-15 minutes). Oven-cooked bacon is one of the many life hacks that has so many benefits it should have its own brochure. Not only does it provides complete control for even cooking, it also frees up the stovetop, makes clean up easy and keeps those damned grease pops safely tucked away.

JPEG image-3D896F2E110E-1

Meanwhile, the bacon fat rendered can be used in cooking the goodies up top.

JPEG image-B7737871C2B8-1

Just as with latkes and fritters, a binding agent is needed for the hash browns to hold its shape, which in this case is the shape of pizza dough. One medium egg is scrambled and tossed with the potatoes, plus some chopped yellow onions and chives for some pizzazz.

JPEG image-51EEAD4D7DAA-1

The mixture is spread into an oiled steel crepe pan over medium heat, evenly spread out and smushed into the natural circular shape of the pan. Once set in place, the potatoes are not to be fussed over until the bottom begins to crisp up (approximately 3-4 minutes).

JPEG image-B2B8BF1F2129-1

The trouble now is the flip, which is why the crepe pan is preferred for its mildly-sloped edges. Using a spatula, loosen the hash browns from the pan all around so that it can easily slide off onto a cutting board, cooked side down. Having very lightly coated the pan in oil again, flip the pan upside-down over the potato disc and then quickly flip the cutting board over to place the potatoes cooked-side up in the pan. Cook over medium heat while placing on toppings of cheese and bacon.

JPEG image-410BF512E637-1

Place the crepe pan, again crucial for its metalware, into the oven to melt the cheese fully. To secure this pizza in the breakfast realm, an egg can be cracked over top and cooked until soft at this time. After pulling the pizza from the oven, the spatula is once more utilized to carefully move the pizza onto a cutting board. More toppings of tomato and finely chopped chives are added just before serving to keep their delicate textures intact.


JPEG image-61388EF4C775-1

The pizza is pretty outstanding. The mix of cheeses (cheddar, monterey jack, mozzarella and cottage cheese) provides a medley of textures ranging from chewy to creamy. The gently-cooked onions offer a layer of extra flavor in each bite, the tomatoes pop with a subtle juiciness and the bountiful heaps of bacon on top and bacon fat throughout do not go unappreciated.

JPEG image-56330DAED5A7-1

As for wine, what better way to preserve the traditions of brunch than to pair this pizza with Champagne. All the grease and cream and fat of brunch dishes can easily be whisked away by refreshing bubbles and crisp acidity while more delicate mainstays like eggs are heightened by an equally light wine.

JPEG image-A48F418C12ED-1

Gosset – “Excellence,” Brut, Champagne, NV, the entry-level offering of the house, is the most complexity needed when brunching. There are hints of limestone and toasty brioche in the glass, and while there is a muskiness in the wine that mirrors the earthy elements in the pizza, the aromas do not inspire much reflection. It’s thoroughly enjoyable without the pressure of having to talk tablemates out of adding a splash of orange juice.

For those who indulge in this brunchtime combo, consider keeping sour cream close by for a truly hedonistic experience.

Week 3 – Greek: Lamb Gyro Pita Pizza

To satisfy the requirements of Week 3’s Greek theme, I contemplated the broad range of flavors found in traditional Greek dishes with the hope of successfully tackling something unfamiliar to my kitchen. The overabundance of ingredients that could be worked with was already quite daunting and I wanted to work with as many as possible without creating a mess of a pie. I squared in on lamb as the main focus, drawn to its grassy, gamey flavors that were still a relative stranger in my kitchen.

JPEG image-62DC71312D49-1

Wanting to see how lamb would fare when sous vided, especially a less tender cut, I took home a pound of shoulder without the clarity of a vision. My overall goal, beyond bringing the flavors of Greece to a pizza, was to achieve meat so tender it would not put up a fight when bitten into, a crucial aspect in building a pie. After tackling an abundantly hearty pizza in last week’s challenge, I wanted to keep flavors lively and fresh in this one. Eventually, the dish found its voice as a fancied up, open-faced lamb gyro, despite the non-traditional meat preparation.

Since only a small portion of the pound of lamb would be needed per pizza, a little experimentation could be afforded. Using a traditional oregano-heavy rub, the lamb was sliced and prepared in two vacuum-sealed bags, one with lemon juice and one without. Both would be steeped at the same 55° C temperature for 24 hours, but the lemon juice was theorized to help tenderize the meat, hopefully to its benefit.

JPEG image-D3FB7F9ACB11-1

And wow did it tenderize. The citrus really had its way with the lamb during its 24 hour span, disintegrating its outer parts into a grey pulp. Of the thicker pieces, I could sort out extremely soft pieces of meat of a recognizable pink hue underneath the exterior. The meat cooked without lemon juice kept its juicy red color and relative firmness while still soft enough to bite through cleanly. To provide some texture, I gave both sets of lamb time on the cast-iron over high heat.

JPEG image-B5151B96268B-1

For the sauce, excess moisture is the enemy. Cucumbers are deseeded of their fleshy core before being grated while the yogurt is placed in a nut bag and fiercely strained of its inherent liquid. The latter process of straining can be applied to the shredded cucumbers after allowing kosher salt to coax out the remaining moisture.

JPEG image-6F11E651C2DC-1

These ingredients are mixed together with lemon juice and finely chopped dill, mint and garlic.

JPEG image-A23911A5A34D-1

After lightly toasting the pita bread, the sauce is heartily slathered on. Using both types of lamb, the meat is laid down first followed by the classic gyro accoutrement of tomato and onions. To add some flair, I sprinkle some feta and sprigs of dill over top. The results are equally as tasty, each slice becoming a miniature gyro of its own.

JPEG image-B9FA625C1C4C-1

To pair, I chose to experiment yet again, tapping two possible pairings for this Greek dish. The first, Domaine Porto Carras – Limnio, Côtes de Meliton, Macedonia, Greece 2012, is an indigenous Greek varietal, Limnio, that features blackberries, dried leather and tar cast in a moody, spiced medium-bodied wine. While bold and straightforward in personality, this wine lacked the softness needed for this particular dish as its intense aromas tended to dominate the flavors on the pita.

JPEG image-7580037FD10D-1

The alternative bottle Joel Taluau – “Cuvée de Chevrette” St-Nicolas de Bourgueil, Touraine, Loire Valley, France 1985, (a birthday gift from my boo), could not be resisted in this pairing as I consider the style a classic alongside lamb. Although three decades of age had pushed this wine into an extremely developed stage in its life, it was still kicking with dried figs and raspberries. The acidity was still bright, offering clarity in the murky concentration of sweet fruit aromas. It was a surprisingly well-matched pairing as it embodied the antithesis of all the fresh cucumber, yogurt and dill while keeping a soft enough profile to not overpower any of the delicate flavors.

JPEG image-F99E090705DC-1

The pizza itself was such a success I made three rounds in one night, chasing those vibrant flavors with birthday wine. I can only hope this is the beginning of a streak. Let’s go, Week 4.